Sooo…just to add to the interwebs stockpile of cosplay sword tutorials…here’s another one for Charles Grey in particular. There aren’t very clear reference images of his sword online…so I referenced what images I could find of Charles with his sword plus stock images/references of rapiers – the kind of sword he carries.


My hilt ended up looking something like this…

It looks nice but I made it waaaay too big. It actually looks kinda dumb hanging on my side. Looks more like a bludgeon than a sword. QQ.
But anyways…to make the sword, I started off with balsa wood as the internal support structure. So the blade, the handle, and the flat horizontal part of the hilt all has balsa wood underneath the worbla covering. I was debating between using foam and balsa but I thought that even covered with worbla, a foam sword would be kinda flimsy. And real wood is just too heavy, so balsa wood was a nice medium. So I bought two long planks of balsa and cut out the blade to the size and shape I wanted it to be. I think for this particular sword, I cut it to be 36″ long and 1.25″ wide and tapered it starting 6″ from the end so the end would terminate to a point. The thickness of the plank was 0.25″.


After I cut out the shape of sword from the big plank with an exacto knife, I smoothed out the hard corners with sandpaper. As a side note, to make it easier on your hands, glue some sandpaper to a block of wood, so it easier to work with.


Yay! Look how smooth that looks after sanding. Whee~~~ Then I had to think about the cross-guard/horizontal part of the hilt. I was planning on using worbla only as my only adhesive so I knew I had to attach the cross guard to the blade in a way that would be structurally sound, instead of just sticking the flat end of the blade to the surface of the cross guard. So this is what I came up with…


Yay! So I was pretty happy with how it looked…I just gave a good sanding between this step and the adding worbla on top step. And then I proceeded to cover the cross guard and blade individually with worbla.


Yahh…so I covered each part individually and then when the worbla was still warm, I shoved the blade into the hole I carved out in the cross guards. Once cooled, it was pretty sturdy but just to be safe and not have my sword fall apart on me during a convention/traveling, I rolled out a thin coil from scrap worbla and coiled it around the joint between the blade and cross-guard for extra reinforcement.
Then, to make the handle,

I also cut out of worbla, a handle. Something along the lines of the picture above. 0.50″ thick and sanded it and covered it in worbla and stuck it onto the bottom of the cross guard. To also reinforce the joint, I added a fat coil of scrap worbla.


So far, so good.

Then this next part (decorating the hilt/making it all fancy) is kinda hazy/if you’re following this tutorial to make your own sword, this is where artistic license comes in. I’ll supply a bunch of pictures of the hilt I made, but most of it was just making stuff up as I went along. I referenced several difference images of rapiers I found on Google images. I used a mixture of worbla scraps rolled out into coils and also craft foam. So yeah, ultimately, I got something that looked like…


But yeah, this is all I got for this tutorial. I’ll try to upload part 2 soon! ^^ Park 2, I’ll discuss what I did to prime and then paint the worbla. :DDDD

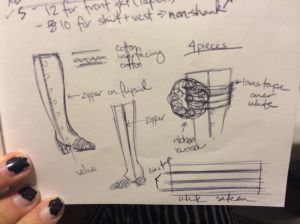 Okay, to draft a perfect fitting pattern to fit over my leg/foot/shoe, I used a method that a lot of cosplayers use when drafting pattern pieces for Worbla armor, which is to wrap your leg with saran wrap and then take masking tape, tape over the saran wrap and sharpie over where you want your seams to be. I know it sounds crazy and definitely looks ridiculous (see below), but it does get a pretty good fit in a quick and easy way. Fair warning, don’t wear pants that you like while going this, because when I cut myself out of the wrap/tape, I cut a hole into my leggings x_____x
 …naise. (btw, these are not the appropriate seam lines for Charles Grey’s spats, this is actually a picture of me doing the same method of drafting for my Saber cosplay. For CG, draw a line down the center front, center back and each side).


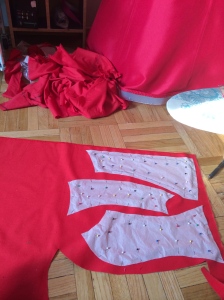


 Welp…that picture turned out smaller than I expected. Whatever, it’s a giant poofy red ballgown. Since I’m already 99% finished with this cosplay, I’ll show pictures of the completed project and then walk my way backwards into the making of.
